|

|  |
After
polishing,
each item has
to be cleaned
with vienna
lime, to
remove any
traces of
polishing
compound,
and then
individuatty
copper wired
again for
cleaning and
to go into the
plating tanks. |
 |
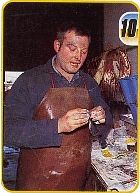
The cleaning process starts by hand
brushing in an industrial cleaning fluid,
followed by a dip in an electrically-
charged cleaning tank (see picture). This
removes all oxides from the surfaces plus
the instant tarnish that occurs as soon as
bare metal is exposed to the atmosphere.
Next, the parts are run through Marque
Restore's 'counterflow rinse system', or
cleaned in their series of progressively
cleaner fresh water swill tanks, to give it
the less technical term. Finally, they go
through a 'sour rinse'- a io% acid
solution which neutralises any sticky
deposits left over from the cleaning
processes. Although this sounds like it
takes a long time, speed is of the essence
at this stage of the process, and
unfortunately Atan wasn't able to hang
around between tanks while we set up
arty shots for the mag - sorry!
|